https://itnext.io/part-1-building-a-progressive-web-application-pwa-with-angular-material-and-aws-amplify-5c741c957259?
This is the first of a series of posts outlining how to build a multi-platform Progressive Web Application (PWA) supporting mobile and desktop environments.
- Part 1 (your are here): Bootstrap an application with Angular/Material, a web application manifest, service worker, icons and add to home screen functionality for iOS (Safari), Android (Chrome), and desktop deployed to the AWS Cloud using the AWS Amplify CLI.
- Part 2: Add Authentication and Authorization with Amazon Cognito supporting individual user profiles and private content.
“PWAs combine the flexibility of the web with the experience of a native application.” — Wikipedia
A Progressive Web Application or PWA is a web application that is install-able on a (supported) mobile device via it’s web browser (Chrome or Safari). The key features and benefits are:
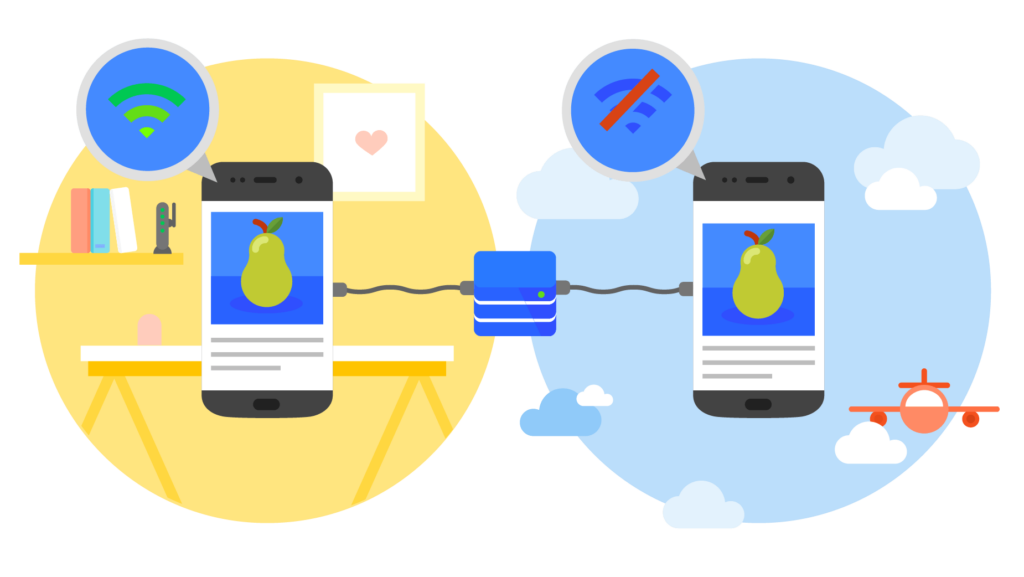
- Reliability and Network Agnostic— Loads instantly and even in uncertain network conditions.
- Install-able — Install-able on a mobile device and available via the devices home screen. A PWA feels like a native app on the device with an immersive user experience.
- Search-able — Since a PWA is a web application and therefore lives on the internet. It is index-able by search engines and does not require an app store for installation.
- Offline — With the help of app caching and service workers, a PWA is usable offline and in low connectivity environments. It also supports push notifications using the web Push API.
In this first article we will build a PWA that works with Chrome browser on Android and desktop (Mac, Windows, and Chrome OS) devices and Safari on iOS (11.3+) devices. The application will be built with Angular 7 and Angular Material. In terms of PWA functionality, there are a few caveats to consider specifically with iOS Safari (Webkit) compared to Android/Chrome.
On March 30th 2018 Apple released the iOS 11.3 update which included basic support for PWAs on iPhones and iPads. As of writing this article, the support is still basic and in development. The Webkit timeline outlines the status of key browser support including the Web application manifest and service workers.
- Icon sizes in the manifest are not all compatible with iOS. You can use <meta> tags instead in the index.html file <head> as we will do below to properly display the icon when adding to home screen in Safari.
- Webkit support for the web application manifest is still in development as of the writing of this article. You can use the pwacompat.js; download it here. This will add rich PWA support for icons, home screen, splash screen etc. in many other browsers including Safari.
- External links don’t work out-of-the-box in Safari. For something like sign in with google, you can set
ux_modeto ‘redirect’ and for others you can directly setwindow.locationhowever, keep in mind there is no back button displayed by Safari so there is then no way to effectively get back to your app once you leave. - There is currently no deep linking in Safari PWAs on iOS. In the web application manifest you can provide
intent_filtersalong with ascopewhich will work only on Android/Chrome. See here for details. - Chrome provides an automatic popup prompting the user to install the PWA if you have everything wired up. Safari currently does not support this. You can make this work by detecting the platform and displaying a custom notification which will be described below.
Getting Started
We will bootstrap the application using the Angular CLI (v7) which will require Node.js (v8.11+). Then we will use the Angular Material UI library to style the user interface and make things responsive for both mobile and desktop. Finally, we will deploy the application to Amazon S3 and CloudFront using the AWS Amplify CLI.
Requirements
- Node.js 8.11+
- AWS Amplify JS 1.x
- AWS Amplify CLI 0.1.x
- Angular 7.x
- Angular CLI 7.x
- Angular Material 7.x
Source code is available on GitHub.
Let’s get started. Generate a new application with the Angular CLI. This will generate a boiler plate Angular project and install all required dependencies. It will also wire up routing and allow you to choose your preferred CSS framework. For this application we will use SCSS, but you can use whichever you prefer.
If you don’t have node.js (and npm) installed on your machine, follow the installation instructions for your operating system here.
$ npm install -g @angular/cli
$ ng new AngularPwaPostOne
$ ? Would you like to add Angular routing? Yes
$ ? Which stylesheet format would you like to use? SCSS
Add the angular material components to the application. This command will wire up the angular material and install the necessary dependencies.
$ cd AngularPwaPostOne
$ ng add @angular/material
$ ? Enter a prebuilt theme name, or "custom" for a custom theme: indigo-pink
$ ? Set up HammerJS for gesture recognition? Yes
$ ? Set up browser animations for Angular Material? Yes
This will bootstrap your application with dependencies for angular material, update configurations, and execute initialization code (see here for more details about what this does). Angular comes out of the box with Hammer.js which is (as their docs say) an “open-source library that can recognize gestures made by touch, mouse and pointerEvents. It doesn’t have any dependencies, and it’s small –only 7.34 kB minified + gzipped!”
The Angular animation system is built on CSS, which means you can animate any property that the browser considers animatable. This includes positions, sizes, transforms, colors, borders, and more. More details here.
Next you will generate a new Angular module that will load the angular material components. This helps separate the concern of loading and instantiating all of the material components while not polluting your application module.
This module will load all of them, however, you could also load only the components you want available to your module.
$ ng generate module material
Open up the src/app/material/material.module.ts file and update the contents with the contents of this gist. This module will load all of the material UI components.
In a production scenario you would probably want to trim this list down to only the components you are using which would decrease your overall JS bundle size.
Now, import the material module into your application module. Edit the app.module.ts file adding the bold sections:
import { BrowserModule } from '@angular/platform-browser';
import { NgModule } from '@angular/core';
import { AppComponent } from './app.component';
import { BrowserAnimationsModule } from '@angular/platform-browser/animations';
import { MaterialModule } from './material/material.module';@NgModule({
  declarations: [ AppComponent ],
  imports: [
    BrowserModule,
    BrowserAnimationsModule,
    MaterialModule
  ],
  providers: [],
  bootstrap: [AppComponent]
});export class AppModule { }
Now we will create some routes and a new home component that will eventually be protected by an AuthGuard.
- Replace the contents of
src/app.component.htmlwith this gist. - Replace the contents of
src/app.component.tswith this gist.
Before we move forward, let’s outline what the deal is with the [brackets] (parenthesis) and (*asterisks) on the html elements found in the app.component.html file.
<app-element #myElement
 directiveName
 [prop]="value"
 [class.className]="cssClass"
 [style.fontSize]="50%"
 [style.stylePropertyName.px]="8"
 [attr.type]="(hide) ? 'password' : 'text'"
 [role.button]="{{myAriaRole}}"
 (click)="onClickEvent()">
</app-element>
- directiveName — In structural directives the long form can only be applied to <template> tags. The short form wraps the element where it is applied in a <template>
- [prop]=”value” is for object binding to properties (@Input() of an Angular component or directive or a property of a DOM element).
There are special forms:
- [class.className] binds to a css class to enable/disable it
- [style.stylePropertyName] binds to a style property
- [style.stylePropertyName.px] binds to a style property with a preset unit
- [attr.attributeName] binds a value to an attribute (visible in the DOM, while properties are not visible)
- [role.roleName] binds to the ARIA role attribute (not yet available)
prop=”{{value}}” binds a value to a property. The value is stringified (aka interpolation) - (event)=”expr” binds an event handler to an @Output() or DOM even
- #myElement has different functions depending on the context.
In a*ngFor=”#x in y; #i=index”scope variables for the iteration are created (In beta.17 this is changed to*ngFor=”let x in y; let i=index”)
– On a DOM element<div #mydiv>is a reference to the element
– On an Angular component it is a reference to the component
– On an element that is an Angular component or has an Angular directive whereexportAs:”ngForm”is defined,#myVar=”ngForm”creates a reference to this component or directive.
More details can be found in the Angular documentation here.
Generate a home component that will serve as main view for our application:
$ ng generate component home
Next, create a default route in the src/app/app-routing-module.ts file (add the bold sections):
import { NgModule } from '@angular/core';
import { Routes, RouterModule } from '@angular/router';
import { HomeComponent } from './home/home.component';const routes: Routes = [
  { path: '', component: HomeComponent }
];@NgModule({
  imports: [RouterModule.forRoot(routes)],
  exports: [RouterModule]
});export class AppRoutingModule { }
There are material theme styles available in this gist you can add/customize in your
styles.scssfile as well.
Now fire up your PWA by running ng serve in your terminal. You should see a responsive view for both mobile and desktop environments. The desktop side bar will be visible on views that are wider than 600 pixels, while on displays less than 600 pixels, a collapsible menu icon will display in the menu bar that will display a left side modal menu when clicked.

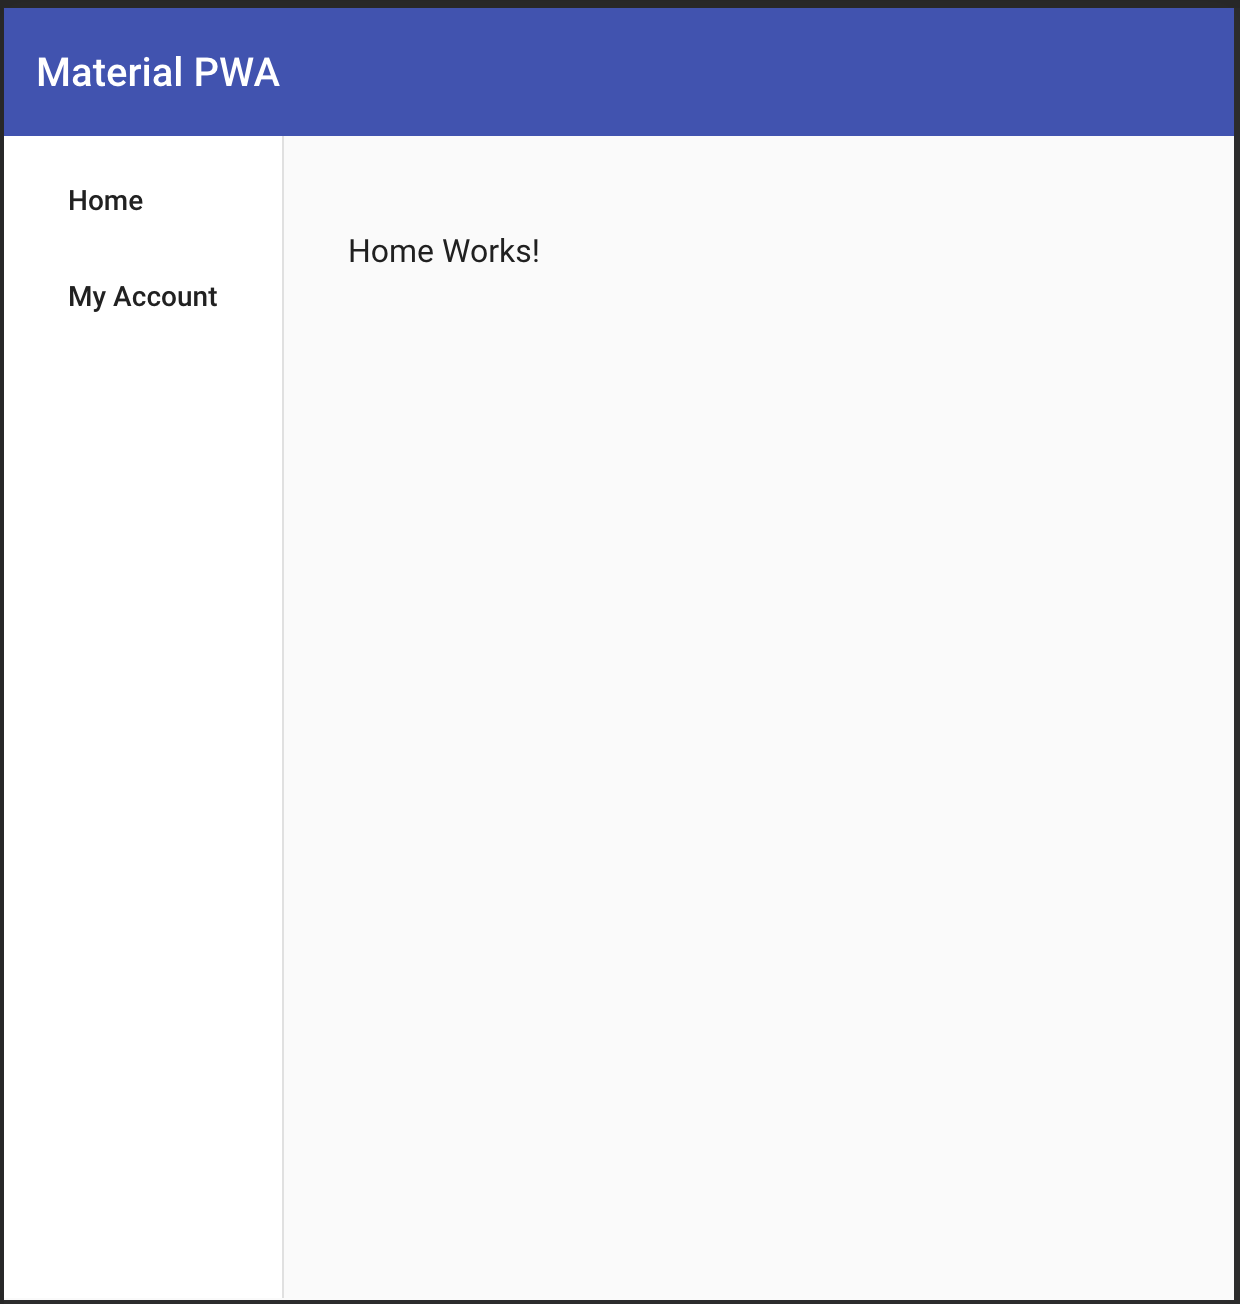

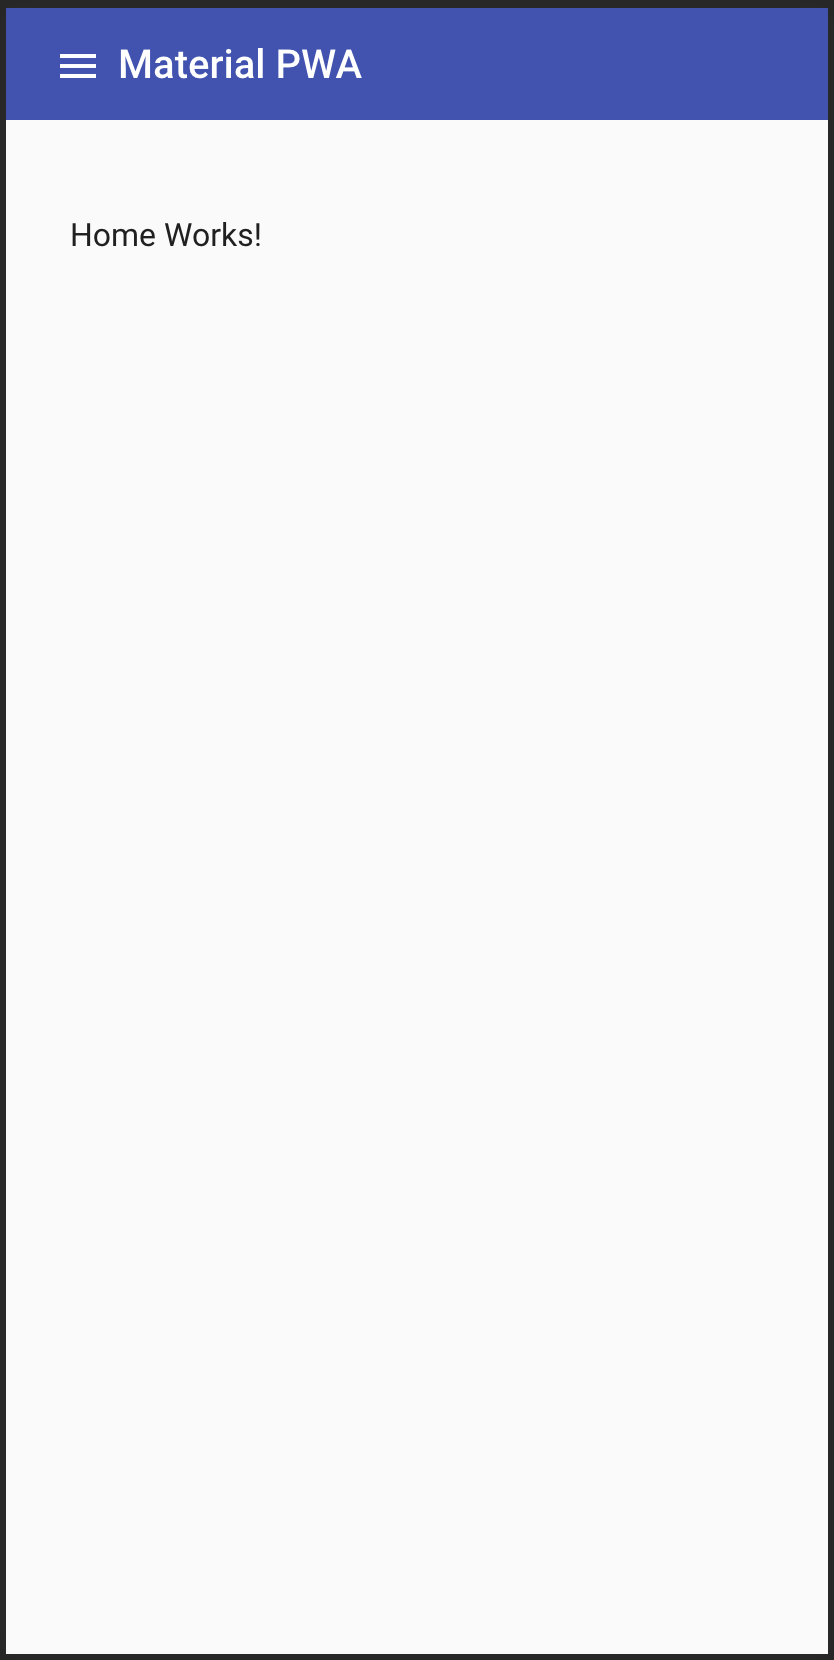
The menu items are dynamically populated within the app.component.ts file.
//--> app.component.ts
nav = [
  {
    'title': 'Home',
    'path': '/'
  },
  {
    'title': 'My Account (part 2)',
    'path': '/auth' //<-- not yet used
  }
];//--> app.component.html
<mat-list>
  <mat-list-item *ngFor="let route of nav">
    <a mat-button
       routerLink="{{route.path}}"
       routerLinkActive="active"
       (click)="toggleMobileNav(lnav)">{{route.title}}</a>
  </mat-list-item>
</mat-list>
PWA Setup
In this section we will outline the configuration and setup of:
- The Web Application Manifest
- The Service Worker
- The Splash Screen
- The pwacompat.js script
- iOS specific <meta> tags
Angular has first class support for generating and managing service workers. The implementation is opinionated and you can choose to use your own service worker if you’d like. For this tutorial, we are going to use the Angular service worker generation and management. For more details see here.
Currently, service workers are supported in the latest versions of Chrome, Firefox, Edge, Safari, Opera, UC Browser (Android version) and Samsung Internet. Browsers like IE and Opera Mini do not provide the support. To learn more about other browsers that are service worker ready, see the Can I Use page and MDN docs.
Add a service worker to your project:
$ ng add @angular/pwa --project AngularPwaPostOne...CREATE ngsw-config.json (441 bytes)
CREATE src/manifest.json (1091 bytes)
CREATE src/assets/icons/icon-128x128.png (1253 bytes)
CREATE src/assets/icons/icon-144x144.png (1394 bytes)
CREATE src/assets/icons/icon-152x152.png (1427 bytes)
CREATE src/assets/icons/icon-192x192.png (1790 bytes)
CREATE src/assets/icons/icon-384x384.png (3557 bytes)
CREATE src/assets/icons/icon-512x512.png (5008 bytes)
CREATE src/assets/icons/icon-72x72.png (792 bytes)
CREATE src/assets/icons/icon-96x96.png (958 bytes)
UPDATE angular.json (4229 bytes)
UPDATE package.json (1557 bytes)
UPDATE src/app/app.module.ts (1205 bytes)
UPDATE src/index.html (660 bytes)
This command will:
- Add the
@angular/service-workerpackage to your project and enable the service worker build support to your angular CLI. - Import and register the service worker in your application module
app.module.tsfile. - Update the
index.htmlfile and include themanifest.jsonfile and adds the appropriate <meta> tags for thetheme-color. - Install sample icon files.
- Create a service worker configuration called
ngsw-config.jsonwhich specifies the caching behavior.
After running this command you will need to build the application with the --prod flag and your project will be setup to use the Angular service worker.
$ ng build --prod
A caveat to developing with service workers and Angular is that the ng serve command does not currently work with service workers. So you need to install and use a separate HTTP server to test your application locally. You can use any HTTP server, in this tutorial we will use the built in python SimpleHTTPServer included with Mac OS.
You can also use http-server from NPM or any other local http server.
Now serve your new PWA locally:
$ pushd dist/AngularPwaPostOne; python -m SimpleHTTPServer; popd
If you are on Python 3+ omit the
-margument:python SimpleHTTPServer.
By default, the application will run on http://localhost:8000. Add this (or whichever http server you used) command to your package.json start script and update the build script to include the --prod argument.
"scripts": {
  "ng": "ng",
  "start": "pushd dist/AngularPwaPostOne; python -m SimpleHTTPServer; popd",
  "build": "ng build --prod",
  "test": "ng test",
  "lint": "ng lint",
  "e2e": "ng e2e"
},
Now you can serve your application locally by running npm start from the command line. Keep in mind, when debugging or developing your service worker, you will need to run ng build --prod prior to debug any changes to locally cached files. Let’s take a look at our registered service worker via Chrome development tools. On Mac press cmd + shift + i or choose the View menu, Developer, Developer Tools option. Choose the “Application” tab.

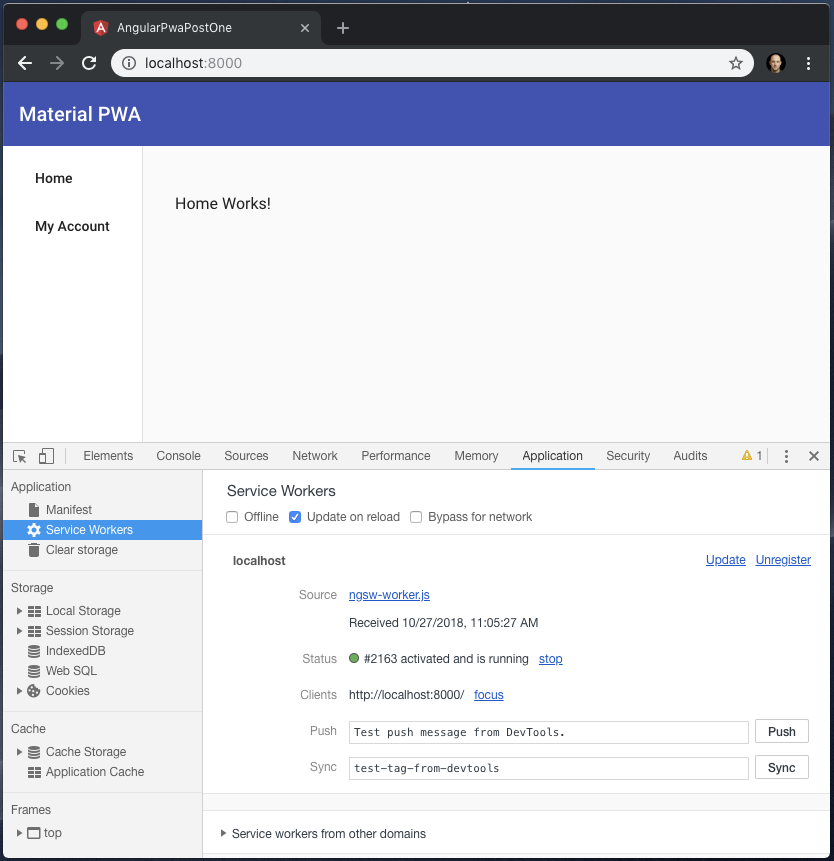
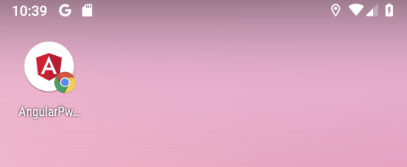
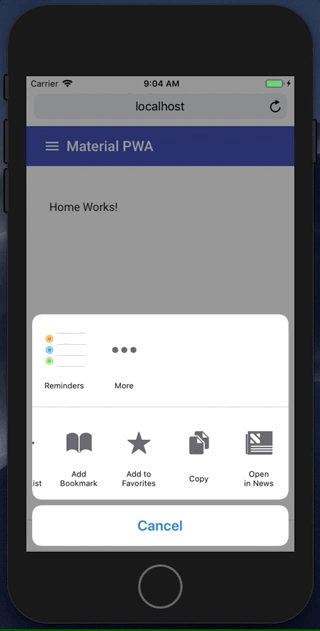
Notice without editing one line of code, we now have a service worker registered. Make sure the “Update on reload” flag is checked; this will automatically reload the Service Worker when a new one is available. Click on the “Manifest” link on the left and you’ll notice the automatically generated Icons as well. These can be edited/re-saved with your own icons. Under the Manifest section, click on “Add to home screen”. This will prompt you to add a shortcut; notice the name and the icon are populated with the values from the generated src/manifest.json file. If you launch your PWA on an Android device you can also add to home screen which will use the generated Icons (or ones you created) that are referenced in the manifest.


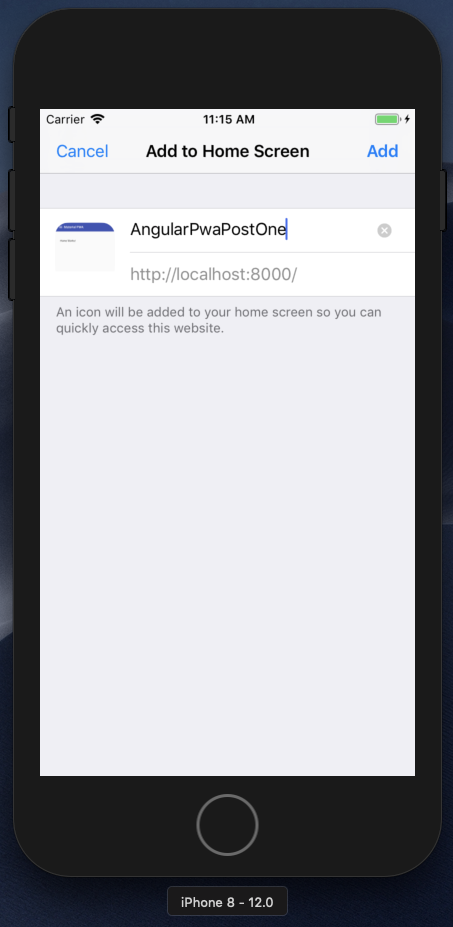
Icons on iOS
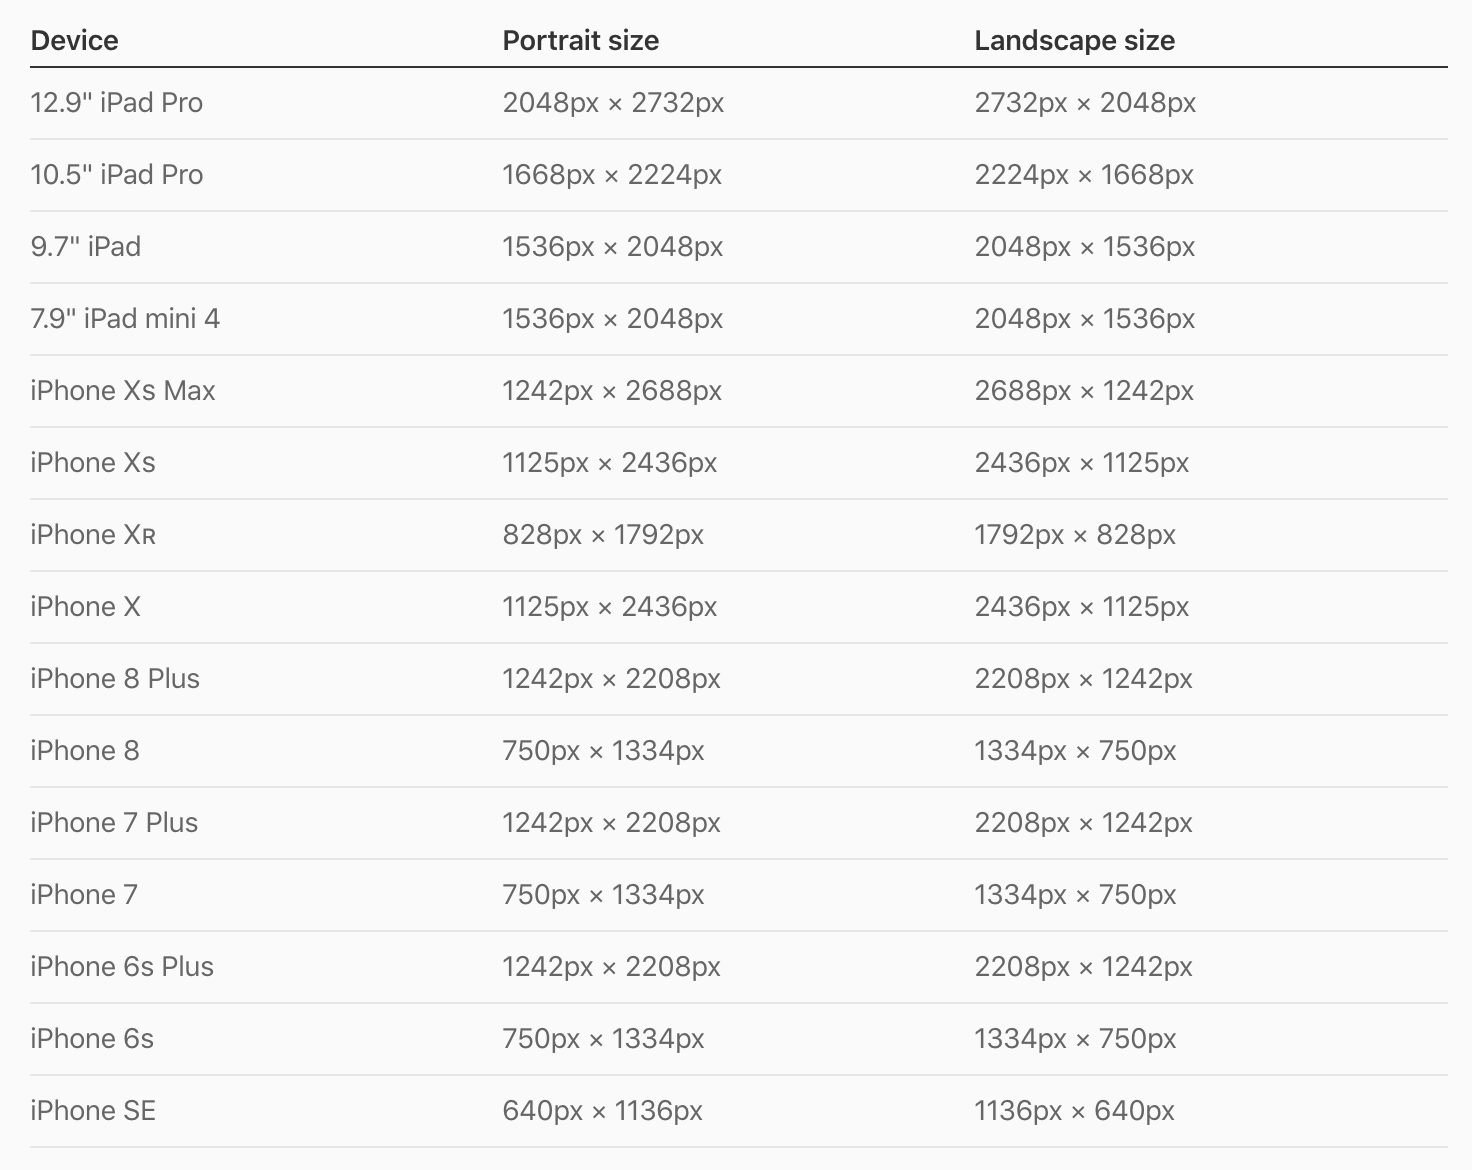
If you now try and load your PWA on an iOS device using Safari, it won’t look so pretty. You can add it the home screen, but as you’ll notice the icon does not display correctly.
You can access your application on your iOS device (make sure you are running iOS 11.3+) by visiting your local IP address on port 8000. On Mac you can visit your System Preferences, choose Network, then note the IP address listed, something like 192.168.10.11. Then visit this address via the iOS device http://192.168.10.11:8000/ and your PWA should load. On the simulator you can access it the same via http://localhost:8000/

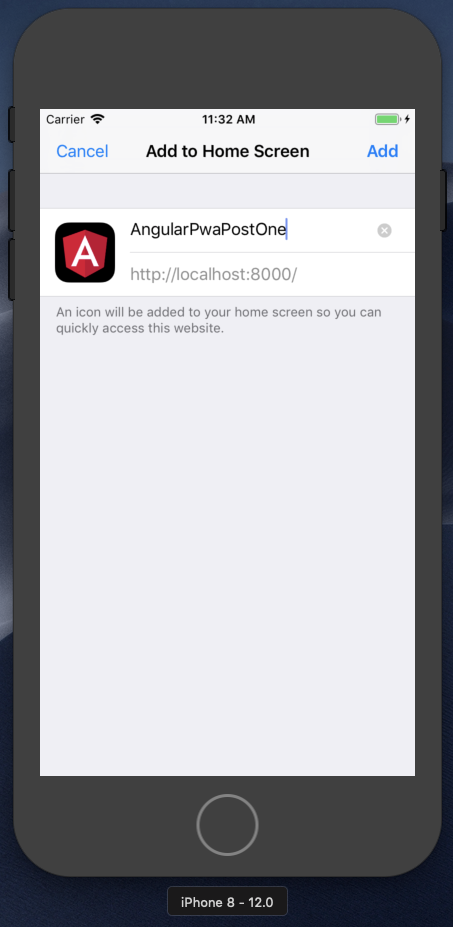
To fix this we need to add a few new icons and some meta tags to the index.html file within the <head> tag:
<meta name="apple-mobile-web-app-capable" content="yes"><link rel="apple-touch-icon" href="assets/icons/icon-512x512.png"><link rel="apple-touch-icon" sizes="152x152" href="assets/icons/icon-152x152.png"><link rel="apple-touch-icon" sizes="180x180" href="assets/icons/icon-192x192.png"><link rel="apple-touch-icon" sizes="167x167" href="assets/icons/icon-192x192.png">
More details are available here on the sizes and capabilities of web applications on iOS. Notice these sizes don’t actually point to the matching iOS sizes. You could, and should, create new icons for these. Since the aspect ratio is the same and the referenced icons are actually larger than the requested, i’m using them for simplicity sake.
In order to view changes to cached resources you will need to clear the local data since the service worker will cache assets. By default, the service worker will cache the following:
index.htmlfavicon.ico- Build artifacts (JS and CSS bundles)
- Anything under
assets
In the simulator you can use the Hardware, Erase all Content and Settings… option to restart and reload. To better deal with this during development we can add a “version” property to the ngsw-config.json file so that the service worker will know to reload cached content from the server. Update ngsw-config.json and add the version property.
{
  "index": "/index.html",
  "version": 1,
...
Next time you want to view any changes to cached resources you can bump this version and re-run the server:
$ ng build --prod
$ npm start
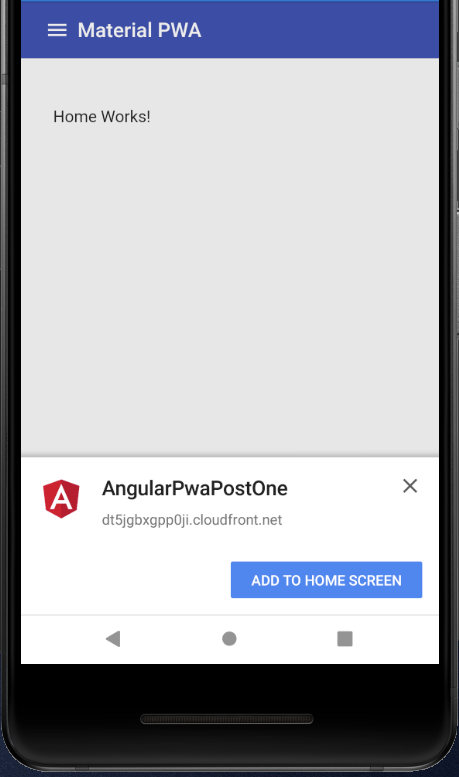
Now, try to add to home screen again and you’ll see the correct icon displayed on iOS when using Safari.


Installation Criteria
In order for applications to be “installable” your PWA needs to not already be installed on the device, and include a web application manifest that provides at minimum:
short_nameornameiconsinclude at least 192px and a 512px sized iconsstart_urldisplayis one of:fullscreen,standalone, orminimal-ui
You can learn more about the web application manifest options here.
The Splash Screen
A splash screen is displayed prior to the application loading and caching. This can be defined in the web application manifest, however iOS/Safari does not currently support generating it from the manifest and instead will just display a white screen (as will Chrome when these values are not defined). Chrome will automatically create a splash screen from the manifest properties:
namebackground_coloricons
Your
background_colorshould equal the same color as your load screen, so it is a smooth transition for the user from splash to your application.
Chrome will select the icon that closely matches the 128dpi icon for that device. Providing a 192px and a 512px icon will work for most cases, but you can provide additional icons.
Safari on iOS devices supports custom meta tags to specify a splash screen apple-touch-startup-image. The sizes of the launch screen are specified in the Graphics portion of the iOS Human Interface Guidelines which can be found here.

For this splash screen I downloaded a photo from unsplash.com and used a sketch template here. Once the images are created, add the following meta tags to your src/index.html:
Now load your application in a simulator or device, add to home screen, and you should see your splash screen display prior to the application loading.
$ ng build --prod
$ npm start

Custom iOS Installation Banner
Android/Chrome will display a friendly install notification when all criteria is met for a PWA, asking the user if they would like to install this application.

TIP: open your
src/manifest.jsonfile and change the"short_name"to something under 12 characters, which is the recommended length so that the home screen does not truncate it.
On iOS/Safari this functionality does not exist but we can create one in Angular/Material with a custom component displayed with the angular material SnackBar.
First generate a custom component that the SnackBar will display:
$ ng generate component iosInstall
Since we will be using this component within a material SnackBar, we will need to perform an additional step so that Angular will load this component imperatively (meaning it’s not displayed within a template). Update the src/app.module.ts file adding an additional property to the @NgModule directive:
@NgModule({
declarations: [
  AppComponent,
  HomeComponent,
  IosInstallComponent
],
imports: [
  BrowserModule,
  AppRoutingModule,
  BrowserAnimationsModule,
  MaterialModule,
  ServiceWorkerModule.register('ngsw-worker.js', { enabled: environment.production })
],
  providers: [AppSyncService],
  bootstrap: [AppComponent],
  entryComponents: [IosInstallComponent]
})
Open the src/app.component.ts file and implement the OnInit lifecycle event.
export class AppComponent implements OnInit
At the top of your class you will also need to
import { OnInit } from '@angular/core';if it is not done for you automatically by your IDE.
Update the constructor method to inject the MatSnackBar component which will display our notification on iOS devices.
constructor( changeDetectorRef: ChangeDetectorRef, media: MediaMatcher, private toast: MatSnackBar )
Then, within the body of the component class, insert the ngOnInit lifecycle method directly after the constructor method.
Don’t forget to
import { IosInstallComponent } from './ios-install/ios-install.component';at the top of your class as well, or pressctrl+spaceat the end of theIosInstallComponentstring in theopenFromComponentmethod.
To give our component the ability to be dismissed, we will update the component constructor. Open ios-install/ios-install.component.ts file and update the constructor method.
constructor( private snackBarRef:MatSnackBarRef<IosInstallComponent> ){}
This adds a reference to the MatSnackBar that launched this component. This will now give us the ability to add a close function.
close() {
  this.snackBarRef.dismiss();
}
Update the src/ios-install/ios-install.component.html view with a custom message that will ask our users to install our PWA to their home screen.
Finally, let’s add some css styles so the close button properly displays on the right hand side of the notification. Update the src/ios-install/ios-install.component.css file.
Build and launch the PWA (remember to clear your cache, reset your simulator, or update your version).
$ ng build --prod
$ npm start

This notification will only display on iOS devices and only when running in the browser e.g. not standalone mode/installed.
Hosting on Amazon S3 and CloudFront
The AWS Amplify CLI provides a pluggable, categorical toolchain for managing your AWS backend using AWS CloudFormation. It only requires an AWS account which can be a free tier account. You can install the CLI via NPM (the CLI requires node version 8.11+).
If you do not have an AWS account, get started here.
$ npm install -g @aws-amplify/cli
For new installations, first run amplify configure to setup your AWS IAM user and configuration. If you have already configured your account, you can skip the configure command.
Once your AWS account credentials and user is configured, run amplify init from your root project directory.
$ amplify init
? Enter a name for the project: AngularPwaPostOne
? Enter a name for for the environment: development
? Choose your default editor: <choose your preferred editor>
? Choose the type of app that you're building javascript
? What javascript framework are you using (Use arrow keys):
❯ angular? What javascript framework are you using angular
? Source Directory Path:  src
? Distribution Directory Path: dist/AmplifyPwaPostOne
? Build Command: ng build --prod
? Start Command: npm startUsing default provider awscloudformationFor more information on AWS Profiles, see:
https://docs.aws.amazon.com/cli/latest/userguide/cli-multiple-profiles.html? Do you want to use an AWS profile? (choose if you have CLI profiles on your machine)
? Please choose the profile you want to use <your-profile>
Be sure you update the Distribution Directory Path option with your project’s name in the dist directory. For example, if you named your project ‘AngularPwaPostOne’ as in this tutorial, this option would be set to
dist/AngularPwaPostOne. You can always re-configure your project by runningamplify configure project.
Once your project environment is configured the next step is to add hosting for your application. Service workers require a secure origin. For serving HTTPs you have two options:
- Enable the PROD mode in hosting for HTTPs with CloudFront
- Setup your own custom domain with Route53 and Amazon Certificate Manager and point it to your S3 bucket
For this tutorial we will use the PROD mode in hosting so we get HTTPs out-of-the-box with the Amplify CLI and Amazon CloudFront. From the root of your project, run:
$ amplify add hosting
? Select the environment setup: (Use arrow keys)
❯ DEV (S3 only with HTTP)
❯ PROD (S3 with CloudFront using HTTPS)? Select the environment setup: PROD (S3 with CloudFront using HTTPS)
? hosting bucket name angularpwapostone
? index doc for the website index.html
? error doc for the website index.htmlYou can now publish your app using the following command:
Command: amplify publish$ amplify publish
Since this step will create a global content deliver distribution with Amazon CloudFront, it will take some time to complete (sometimes up to 10 minutes). Once complete, you can access your PWA on your CloudFront distribution’s HTTPs endpoint that is displayed in your terminal.
✔ All resources are updated in the cloudHosting endpoint: https://********.cloudfront.net
When deploying another version of your application, you may want to invalidate the CloudFront cache so that your new version displays right away. To do this, run the public command with the -c argument.
$ amplify publish -c
This will invalidate your CloudFront cache and populate it with the latest from the origin which is in our case, the Amazon S3 bucket. When deploying you may also want to update the version of your service worker via the ngsw-confg.json “version” property as outlined above. This will notify the system that there is a new version of the service worker and static files available. This will prompt the user to re-install the app and download/install the new service worker as well as cache the new static files.
Your application is now hosted on CloudFront distributed via a global CDN and cached locally in the browser by a service worker. The web application manifest and HTML meta tags will provide icons and standalone mode installation for iOS and Android. Stay tuned for the next article where we will add a custom multi-factor authentication system with Amazon Cognito and the AWS Amplify Auth category.