
HTTP REDIRECTION
Issue
I want to redirect internet traffic from my root (apex) domain (for instance, example.com) to another domain (for instance, example.net). How can I do this?
Resolution
Use the following procedure to redirect your domain. In this example, we redirect example.com to example.net.
Requirements
- A hosted zone for the domain example.com that is hosted in Amazon Route 53.
- You have permissions to add resource records to the hosted zone of example.com.
- You have permissions to create an Amazon Simple Storage Service (Amazon S3) bucket.
- You are able to create an S3 bucket with the exact name for example.com.
Note: The sites must use HTTP, because the redirect can’t connect to Amazon S3 over HTTPS. For HTTPS redirection follow instructions in the CloudFront section below.
- In the Amazon S3 console, create an S3 bucket with the exact name as example.com.
Note: S3 bucket names must be globally unique. If the bucket name you need is already in use, you can’t use Amazon S3 for redirection. Consider other workarounds such as configuring redirection on your backend server. - Select the bucket you just created, and then choose Properties. Expand the Static Website Hosting drop-down menu, and then choose Redirect all requests to another host name.
- In the Redirect all requests to another host name field, enter example.net, and then choose Save.
- In the Route 53 console, select the hosted zone named example.com.
- Create a resource record for example.com with the following values:
Record Type: Choose A – IPv4 address.
Alias: Choose Yes.
Alias Target: Select the blank value field, expand the drop-down menu, and then choose your S3 bucket under the heading S3 Website Endpoints.
Routing Policy: Choose Simple.
Evaluate Health Target: Choose No, and then choose Create.
Note: The drop-down menu might take a few moments to populate your bucket name.
You should now be able to redirect example.com to example.net. You can confirm this by browsing to example.com or CURL to example.com. You should see “301 Moved Permanently” in your curl output, redirecting to example.net.
[fusion_title title_type=”text” rotation_effect=”bounceIn” display_time=”1200″ highlight_effect=”circle” loop_animation=”off” highlight_width=”9″ highlight_top_margin=”0″ before_text=”” rotation_text=”” highlight_text=”” after_text=”” hide_on_mobile=”small-visibility,medium-visibility,large-visibility” sticky_display=”normal,sticky” class=”” id=”” content_align_medium=”” content_align_small=”” content_align=”left” size=”1″ font_size=”” animated_font_size=”” fusion_font_family_title_font=”” fusion_font_variant_title_font=”” line_height=”” letter_spacing=”” text_shadow=”no” text_shadow_vertical=”” text_shadow_horizontal=”” text_shadow_blur=”0″ text_shadow_color=”” margin_top_medium=”” margin_bottom_medium=”” margin_top_small=”” margin_bottom_small=”” margin_top=”25px” margin_bottom=”” margin_top_mobile=”” margin_bottom_mobile=”” text_color=”” animated_text_color=”” highlight_color=”” style_type=”default” sep_color=”” animation_type=”” animation_direction=”left” animation_speed=”0.3″ animation_offset=””]
Bucket Properties
[/fusion_title][fusion_imageframe image_id=”2441|full” max_width=”” sticky_max_width=”” style_type=”” blur=”” stylecolor=”” hover_type=”none” bordersize=”” bordercolor=”” borderradius=”” align_medium=”none” align_small=”none” align=”none” margin_top=”” margin_right=”” margin_bottom=”” margin_left=”” lightbox=”no” gallery_id=”” lightbox_image=”” lightbox_image_id=”” alt=”” link=”” linktarget=”_self” hide_on_mobile=”small-visibility,medium-visibility,large-visibility” sticky_display=”normal,sticky” class=”” id=”” animation_type=”” animation_direction=”left” animation_speed=”0.3″ animation_offset=”” filter_hue=”0″ filter_saturation=”100″ filter_brightness=”100″ filter_contrast=”100″ filter_invert=”0″ filter_sepia=”0″ filter_opacity=”100″ filter_blur=”0″ filter_hue_hover=”0″ filter_saturation_hover=”100″ filter_brightness_hover=”100″ filter_contrast_hover=”100″ filter_invert_hover=”0″ filter_sepia_hover=”0″ filter_opacity_hover=”100″ filter_blur_hover=”0″]http://www.headsoft.net/wp-content/uploads/s3_static_web_page.jpg[/fusion_imageframe][fusion_title title_type=”text” rotation_effect=”bounceIn” display_time=”1200″ highlight_effect=”circle” loop_animation=”off” highlight_width=”9″ highlight_top_margin=”0″ before_text=”” rotation_text=”” highlight_text=”” after_text=”” hide_on_mobile=”small-visibility,medium-visibility,large-visibility” sticky_display=”normal,sticky” class=”” id=”” content_align_medium=”” content_align_small=”” content_align=”left” size=”1″ font_size=”” animated_font_size=”” fusion_font_family_title_font=”” fusion_font_variant_title_font=”” line_height=”” letter_spacing=”” text_shadow=”no” text_shadow_vertical=”” text_shadow_horizontal=”” text_shadow_blur=”0″ text_shadow_color=”” margin_top_medium=”” margin_bottom_medium=”” margin_top_small=”” margin_bottom_small=”” margin_top=”25px” margin_bottom=”” margin_top_mobile=”” margin_bottom_mobile=”” text_color=”” animated_text_color=”” highlight_color=”” style_type=”default” sep_color=”” animation_type=”” animation_direction=”left” animation_speed=”0.3″ animation_offset=””]
Bucket Permissions
[/fusion_title][fusion_imageframe image_id=”2445|full” max_width=”” sticky_max_width=”” style_type=”” blur=”” stylecolor=”” hover_type=”none” bordersize=”” bordercolor=”” borderradius=”” align_medium=”none” align_small=”none” align=”none” margin_top=”” margin_right=”” margin_bottom=”” margin_left=”” lightbox=”no” gallery_id=”” lightbox_image=”” lightbox_image_id=”” alt=”” link=”” linktarget=”_self” hide_on_mobile=”small-visibility,medium-visibility,large-visibility” sticky_display=”normal,sticky” class=”” id=”” animation_type=”” animation_direction=”left” animation_speed=”0.3″ animation_offset=”” filter_hue=”0″ filter_saturation=”100″ filter_brightness=”100″ filter_contrast=”100″ filter_invert=”0″ filter_sepia=”0″ filter_opacity=”100″ filter_blur=”0″ filter_hue_hover=”0″ filter_saturation_hover=”100″ filter_brightness_hover=”100″ filter_contrast_hover=”100″ filter_invert_hover=”0″ filter_sepia_hover=”0″ filter_opacity_hover=”100″ filter_blur_hover=”0″]http://www.headsoft.net/wp-content/uploads/s3_permissions_public.jpg[/fusion_imageframe][fusion_imageframe image_id=”2446|full” max_width=”” sticky_max_width=”” style_type=”” blur=”” stylecolor=”” hover_type=”none” bordersize=”” bordercolor=”” borderradius=”” align_medium=”none” align_small=”none” align=”none” margin_top=”” margin_right=”” margin_bottom=”” margin_left=”” lightbox=”no” gallery_id=”” lightbox_image=”” lightbox_image_id=”” alt=”” link=”” linktarget=”_self” hide_on_mobile=”small-visibility,medium-visibility,large-visibility” sticky_display=”normal,sticky” class=”” id=”” animation_type=”” animation_direction=”left” animation_speed=”0.3″ animation_offset=”” filter_hue=”0″ filter_saturation=”100″ filter_brightness=”100″ filter_contrast=”100″ filter_invert=”0″ filter_sepia=”0″ filter_opacity=”100″ filter_blur=”0″ filter_hue_hover=”0″ filter_saturation_hover=”100″ filter_brightness_hover=”100″ filter_contrast_hover=”100″ filter_invert_hover=”0″ filter_sepia_hover=”0″ filter_opacity_hover=”100″ filter_blur_hover=”0″]http://www.headsoft.net/wp-content/uploads/s3_permissions_acl.jpg[/fusion_imageframe]
HTTPS REDIRECTION
- Open the CloudFront console.
- Choose Create Distribution.
- Under Web, choose Get Started.
- For Origin Domain Name, enter your S3 bucket’s website endpoint.
- For Viewer Protocol Policy, choose HTTP and HTTPS.
Note: Choosing HTTPS Only blocks all HTTP requests.
If you’re not using a custom domain with CloudFront, then choose Create Distribution to complete the process. If you are using a custom domain, then follow these additional steps before you create the distribution:
- For Alternate Domain Names (CNAMEs), type your custom domain.
- For SSL Certificate, choose Custom SSL Certificate. Then, choose the custom SSL certificate to assign to the distribution.
Note: For more information on installing a certificate, see How do I configure my CloudFront distribution to use an SSL/TLS certificate? - Choose Create Distribution.
Note: After you choose Create Distribution, it can take about 20 minutes for your distribution to deploy.
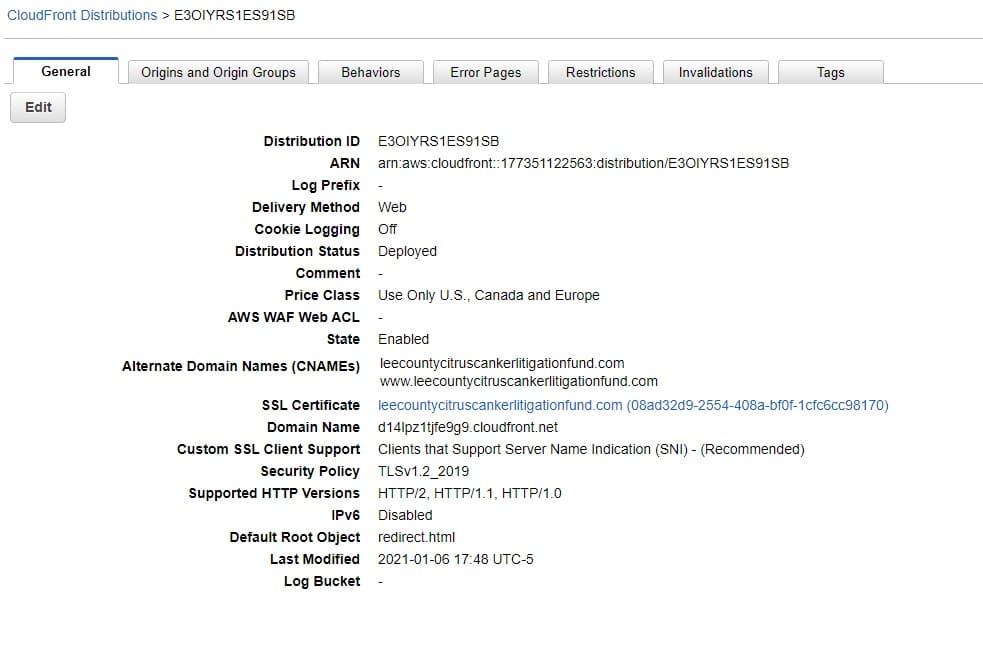
Be sure to update the DNS for your domain to a CNAME record that points to the CloudFront distribution’s provided domain. You can find your distribution’s domain name in the CloudFront console.
If you’re using Amazon Route 53 as your DNS provider, see Configuring Amazon Route 53 to route traffic to a CloudFront web distribution. If you’re using another DNS provider, you can create a CNAME record (www.example.com CNAME d111111abcdef8.cloudfront.net) to point to the distribution’s domain.
Important: DNS standards require that an apex domain (example.com) use an authoritative (A) record that maps to an IP address. You can point your apex domain to your CloudFront distribution only if you’re using Route 53. If you’re using another DNS provider, you must use a subdomain (www.example.com).
S3 redirection root page: Add a redirect.html file within the web site hosting bucket with a small redirect page. Then point the CloudFront distribution to the new page instead of index. The final step is to have two aliases on my domain pointing to the CloudFront distribution.
redirect.html:
<!DOCTYPE html>
<html>
<head>
  <meta http-equiv="refresh" content="0; url=https://jjt.dev">
</head>
<body>
</body>
</html>
CloudFront Origin:
Make sure you select a correct identity and choose to update bucket policy – this will create a correct bucket permissions. Enter all desired origins (ex. naked and www)

Route 53 setup:
