As well as giving me something new to play around with, the reasons behind this decision included
- It provides another level of verification: you know my account is authentic because it’s under
mastodon.headsoft.net - It gives me more control over which instances are (and are not) blocked
mastodon.socialwas getting a little slow as a result of intense load- I’m intending to create a bot or two at some point and didn’t want to annoy anyone
- Failures become mine to own (for better or worse)
Mastodon’s documentation on installing from source is pretty detailed. However, for various reasons, I’ve generally moved away from installing software onto the host, and use containerised solutions where possible.
I assumed that deployment via Docker was quite well supported as I’d found
- a docker-compose.yml in the source repo
- a post by Peter Babič detailing the process.
However, it turned out to be a little more complex than expected.
It’s not terrible, by any means, but the process can be a little unintuitive (a few things have also changed a bit since Peter’s post).
In this post, I’ll describe the process I used to get my Mastodon server up and running using docker-compose.
Do I need to run my own instance?
There seems to have been some confusion around this on social media: you do not need to run your own instance of Mastodon in order to use it. You can simply find a Mastodon server which seems best aligned with your interests (it’s not massively important, you’ll still be able to see, follow and communicate with people on other servers).
Running your own instance is an option, rather than something that’s mandatory.
In fact, if you’re just starting off in the fediverse, starting by running your own instance might hamper your ability to discover people to follow. The federated activity tab shows posts from instances that your instance knows about, but if you’re not following anyone there’ll be no federated activity to show. It’s well worth spending some time on a larger instance first to get a feel for who you want to follow.
This post is more about sharing my experiences for those who do want to run their own instance (and do so using docker).
Assumptions
This document assumes a few things
- You’ve already configured DNS to point your chosen domain to the system that you’re deploying on
- You already have
docker,docker-composeandgitinstalled on that system
It also assumes that your system has sufficient resources to run Mastodon. I couldn’t find any documentation ahead of time to indicate what might be considered sufficient, but I give some observations on minimum requirements below.
Getting the Repo
We’re going to use released/tagged docker images rather than building from source (there are some definite advantages to building from source, but it’s better to use battle-tested images until you’re in a position to know whether it was you that broke something.).
However, we need to fetch that docker-compose.yml file, and it’s worth being able to keep a note of exactly which version of it we have (in case it changes/breaks in future releases).
Clone the repo down, and then create a branch named based upon the latest tag
git clone https://github.com/mastodon/mastodon.git
cd mastodon
latest=$(git describe --tags `git rev-list --tags --max-count=1`)
git checkout $lastest -b ${latest}-branch
Preparation
When docker-compose is run, it’ll create some directories to act as volumes for the various images. However, we don’t really want those to be created inside a copy of a git repo (it’s just asking for someone to run reset --hard --origin), so make a copy of the compose file in the parent directory
cd ..
cp mastodon/docker-compose.yml ./
Use your text editor of choice to edit docker-compose.yml and change a few things
- comment out the lines starting with
build: - change the image line to use a tagged version (e.g.
tootsuite/mastodon:v4.0) - (optional) define
container_namefor each (this means you’ll get a defined name rather than compose’s generated one)
This should give you YAML that looks something like this
version: '3'
services:
  db:
    restart: always
    image: postgres:14-alpine
    container_name: postgres
    shm_size: 256mb
    networks:
      - internal_network
    healthcheck:
      test: ['CMD', 'pg_isready', '-U', 'postgres']
    volumes:
      - ./postgres14:/var/lib/postgresql/data
    environment:
      - 'POSTGRES_HOST_AUTH_METHOD=trust'

  redis:
    restart: always
    image: redis:7-alpine
    container_name: redis
    networks:
      - internal_network
    healthcheck:
      test: ['CMD', 'redis-cli', 'ping']
    volumes:
      - ./redis:/data

  # es:
  #   restart: always
  #   image: docker.elastic.co/elasticsearch/elasticsearch:7.17.4
  #   environment:
  #     - "ES_JAVA_OPTS=-Xms512m -Xmx512m -Des.enforce.bootstrap.checks=true"
  #     - "xpack.license.self_generated.type=basic"
  #     - "xpack.security.enabled=false"
  #     - "xpack.watcher.enabled=false"
  #     - "xpack.graph.enabled=false"
  #     - "xpack.ml.enabled=false"
  #     - "bootstrap.memory_lock=true"
  #     - "cluster.name=es-mastodon"
  #     - "discovery.type=single-node"
  #     - "thread_pool.write.queue_size=1000"
  #   networks:
  #      - external_network
  #      - internal_network
  #   healthcheck:
  #      test: ["CMD-SHELL", "curl --silent --fail localhost:9200/_cluster/health || exit 1"]
  #   volumes:
  #      - ./elasticsearch:/usr/share/elasticsearch/data
  #   ulimits:
  #     memlock:
  #       soft: -1
  #       hard: -1
  #     nofile:
  #       soft: 65536
  #       hard: 65536
  #   ports:
  #     - '127.0.0.1:9200:9200'

  web:
#    build: .
    image: tootsuite/mastodon:v4.0.2
    restart: always
    container_name: web
    env_file: .env.production
    command: bash -c "rm -f /mastodon/tmp/pids/server.pid; bundle exec rails s -p 3000"
    networks:
      - external_network
      - internal_network
    healthcheck:
      # prettier-ignore
      test: ['CMD-SHELL', 'wget -q --spider --proxy=off localhost:3000/health || exit 1']
    ports:
      - '127.0.0.1:3000:3000'
    depends_on:
      - db
      - redis
      # - es
    volumes:
      - ./public/system:/mastodon/public/system

  streaming:
#    build: .
    image: tootsuite/mastodon:v4.0.2
    restart: always
    container_name: streaming
    env_file: .env.production
    command: node ./streaming
    networks:
      - external_network
      - internal_network
    healthcheck:
      # prettier-ignore
      test: ['CMD-SHELL', 'wget -q --spider --proxy=off localhost:4000/api/v1/streaming/health || exit 1']
    ports:
      - '127.0.0.1:4000:4000'
    depends_on:
      - db
      - redis
  sidekiq:
#    build: .
    image: tootsuite/mastodon:v4.0.2
    restart: always
    container_name: sidekiq
    env_file: .env.production
    command: bundle exec sidekiq
    depends_on:
      - db
      - redis
    networks:
      - external_network
      - internal_network
    volumes:
      - ./public/system:/mastodon/public/system
    healthcheck:
      test: ['CMD-SHELL', "ps aux | grep '[s]idekiq\ 6' || false"]
  ## Uncomment to enable federation with tor instances along with adding the following ENV variables
  ## http_proxy=http://privoxy:8118
  ## ALLOW_ACCESS_TO_HIDDEN_SERVICE=true
  # tor:
  #   image: sirboops/tor
  #   networks:
  #      - external_network
  #      - internal_network
  #
  # privoxy:
  #   image: sirboops/privoxy
  #   volumes:
  #     - ./priv-config:/opt/config
  #   networks:
  #     - external_network
  #     - internal_network

networks:
  external_network:
  internal_network:
    internal: true
You don’t need to enable the es instance unless you intend to enable fulltext searching (which is outside the scope of this post).
Setting up PostgreSQL
The next thing we need to do is to create a Postgres Role.
There’s a subtle difference between Peter’s post and what’s needed now: the name of the base directory for postgres’s volume has changed in the compose file (at time of writing, from postgres to postgres14).
So, begin by confirming the necessary name
grep "./postgr" docker-compose.yml | cut -d: -f1
This will return something like
- ./postgres14
Also get the image name (something like tootsuite/mastodon:v4.0.2)
grep "image: postg" docker-compose.yml
Generate a password for the Postgres user to use:
cat /dev/urandom | tr -dc "a-zA-Z0-9" |fold -w 24 | head -n 1
Replace the period in the volume path (.) with $PWD and use that, the generated password and the image name in the next command
docker run --rm --name postgres \
-v <volume path>:/var/lib/postgresql/data \
-e POSTGRES_PASSWORD=<password> \
-d <image name>
For example
docker run --rm --name postgres \
-v $PWD/postgres14:/var/lib/postgresql/data \
-e POSTGRES_PASSWORD="wLWoH4ghPXt7JjYI26Bi5Hfh" \
-d postgres:14-alpine
Docker will have created a postgres data directory on disk, so now we want to create the Role.
Exec into a psql shell
docker exec -it postgres psql -U postgres
Run the following (replacing with the password used above)
CREATE USER mastodon WITH PASSWORD '<password>' CREATEDB;
exit
Stop the Postgres container
docker stop postgres
Mastodon Setup
We’re almost ready to launch Mastodon’s setup utility.
However, if we simply try and launch setup, Docker will refuse to start the containers because .env.production doesn’t exist.
I had initially just touch‘d the file (because you won’t know what to put in it until after setup is complete), however, doing this leads to setup failing part way through.
There’s a step where the setup script exports environment variables for use by later steps. However, some of those steps execute within a different container and variables exported in one container won’t be available to another, so the streaming container fails to connect to Redis (because it tries to connect to the default – localhost rather than the redis container).
To resolve this, we start by creating .env.production with known connection details (replace the Database password with the correct value)
cat << EOM > .env.production
DB_HOST=db
DB_PORT=5432
DB_NAME=mastodon
DB_USER=mastodon
DB_PASS=<replace>
REDIS_HOST=redis
REDIS_PORT=6379
REDIS_PASSWORD=
EOM
(REDIS_PASSWORD is supposed to have an empty value in the above).
With this file created, we’re ready to fire off the setup process
docker-compose run --rm web bundle exec rake mastodon:setup
This will prompt you for some information:
Domain name: mastodon.headsoft.net

Single user mode disables registrations and redirects the landing page to your public profile.
Do you want to enable single user mode? No

Are you using Docker to run Mastodon? Yes

PostgreSQL host: db
PostgreSQL port: 5432
Name of PostgreSQL database: postgres
Name of PostgreSQL user: mastodon
Password of PostgreSQL user:
Database configuration works!

Redis host: redis
Redis port: 6379
Redis password:
Redis configuration works!

Do you want to store uploaded files on the cloud? No

Do you want to send e-mails from localhost? No
You’ll be prompted for SMTP details.
Once you’ve provided all the necessary information, it’ll print a bunch of environment variables
LOCAL_DOMAIN=mastodon.headsoft.net
SINGLE_USER_MODE=false
SECRET_KEY_BASE=<redacted>
OTP_SECRET=<redacted>
VAPID_PRIVATE_KEY=<redacted>
VAPID_PUBLIC_KEY=<redacted>
DB_HOST=db
DB_PORT=5432
DB_NAME=mastodon
DB_USER=mastodon
DB_PASS=<redacted>
REDIS_HOST=redis
REDIS_PORT=6379
REDIS_PASSWORD=
SMTP_SERVER=<redacted>
SMTP_PORT=587
SMTP_LOGIN=<redacted>
SMTP_PASSWORD=<redacted>
SMTP_AUTH_METHOD=plain
SMTP_OPENSSL_VERIFY_MODE=peer
SMTP_ENABLE_STARTTLS=always
SMTP_FROM_ADDRESS=<redacted>
Take a copy of these, and in another terminal, save them into .env.production (you can remove the lines added earlier).
The setup script will ask whether you want to create the admin user, and once that’s done will print the initial auto-generated password for this account
Do you want to create an admin user straight away? Yes
Username: admin
E-mail: <redacted>
You can login with the password: <redacted>
You can change your password once you login.
The initial setup is now complete, and the container should exit.
If the process failed for some reason, once you’ve figured out what you need to correct, you can’t just re-run the setup script: you’ll need to add the following to .env.production first
# Don't add this unless your initial setup failed
DISABLE_DATABASE_ENVIRONMENT_CHECK=1
On your re-run, when it asks you if you want to proceed with destroying the database, choose Yes (otherwise you’ll run into key constraints when it tries to create the admin user).
Directory Permissions
We now want to briefly run the containers. This will cause the volume directories to be created on disk so that we can set permissions appropriately (reducing risk if something else gets compromised)
docker-compose up -d # will take a bit
docker-compose down
Fix permissions
sudo chown -R 70:70 postgres
sudo chown -R 991:991 public/
Startup
It’s time to bring the containers up
docker-compose up -d
The system is now up and running: the web container will be listening on the loopback interface for port 3000, and streaming is on 4000.
Of course, this isn’t all that useful, you’re going to need them to be accessible via the same port, and preferably via HTTPS.
Nginx Setup
The simplest way to expose the service is to use Nginx – it can terminate the SSL connection, and can proxy to multiple upstreams.
If you’ve already got Nginx running, you can skip to configuring the HTTPS server block below.
Add the following to docker-compose.yml
http:
    restart: always
    image: openresty/openresty
    container_name: openresty
    networks:
      - external_network
      - internal_network
    ports:
        - 443:443
        - 80:80
    volumes:
        - ./nginx/tmp:/var/run/openresty
        - ./nginx/conf.d:/etc/nginx/conf.d
        - /etc/letsencrypt/:/etc/letsencrypt/
        - ./nginx/lebase:/lebase
(I use openresty rather than vanilla nginx because it let’s me do things like add georestrictions.
To create the base directories, run
mkdir -p nginx/conf.d nginx/tmp nginx/certs
Next create nginx/conf.d/mastodon.conf with the following content
server {
        listen 80;
        listen   [::]:80;

        root /lebase;
        index index.html index.htm;

        server_name mastodon.headsoft.net; # Replace with your domain name

        location ~ /.well-known/acme-challenge {
            try_files $uri $uri/ =404;
        }

        location / {
                return 301 https://$server_name$request_uri;
        }
}
Start the container
docker-compose up -d
Install certbot (follow the relevant instructions for your distro)
pip install certbot
With certbot available you should now be able to acquire a certificate for your domain
certbot certonly --webroot \
-w $PWD/nginx/lebase -d <your domain> --rsa-key-size 4096
This should acquire a cert for you to use, and will write it into /etc/letsencrypt/live.
Enabling HTTPS
Now, we need to add the HTTPS config to nginx/conf.d/mastodon.conf.
If you’re running nginx on the host rather than in a container, replace the proxy_pass addresses with http://127.0.0.1:3000 and http://127.0.0.1:4000
server {
        listen 443 ssl http2;
        listen [::]:443 ssl http2;
        root /mnt/none;
        index index.html index.htm;

        server_name mastodon.headsoft.net; # Replace with your domain name


        ssl on;

        # Replace your domain in these paths
        ssl_certificate      /etc/letsencrypt/live/mastodon.headsoft.net/fullchain.pem;
        ssl_certificate_key  /etc/letsencrypt/live/mastodon.headsoft.net/privkey.pem;

        ssl_session_timeout  5m;
        ssl_prefer_server_ciphers On;
        ssl_protocols TLSv1 TLSv1.1 TLSv1.2;


        absolute_redirect off;
        server_name_in_redirect off;

        error_page 404 /404.html;
        error_page 410 /410.html;


        location / {
            proxy_set_header Host $http_host;
            proxy_set_header X-Forwarded-Proto https;

            proxy_pass http://web:3000;
        }

        location ^~ /api/v1/streaming {
            proxy_set_header Host $http_host;
            proxy_set_header X-Forwarded-Proto https;

            proxy_pass http://streaming:4000;

            proxy_buffering off;
            proxy_redirect off;
            proxy_http_version 1.1;
            tcp_nodelay on;
        }
}
The Nginx config above is derived from the example nginx.conf in Mastodon, having learnt a few things
- Mastodon will reject requests with a
hostheader that does not match the domain specified when setting up - If
X-Forwarded-Protois not set tohttpsthe mastodon container will try and redirect to HTTPS (causing a redirect loop) - The streaming section should not use buffering
Finally, have Nginx load the config
docker restart openresty
Mastodon Login
You should now be able to visit https://<yourdomain> and login with your admin email address and the password that was auto-generated during the setup stage (remember to change it).
Your server is up and running!
You probably don’t want to use admin for your public profile, so register a new account.
Once you’ve registered your account, check that federation is working correctly by
- Searching for another user (e.g.
@marek@mastodon.headsoft.net) on your instance - Searching for your user from another instance (e.g.
mastodon.social) – see below for a weird issue I encountered
Backup
There isn’t a built-in backup solution, so you’ll need to set something up. Mastodon’s docs give details on what you should care about, and why.
You can backup the Postgres databases with the following command
docker exec postgres pg_dumpall -U postgres > postgres_backup.sql
You’ll also want to back up the directory containing your docker-compose.yml and the directories
postgres14publicredis
Along with the file .env.production (as that contains application secrets)
TODO List
Although the server is up and running, there are still some things that you’ll probably want to do
- Set up 2FA on all accounts
- Go into
Preferences->Administration->Server Settings->Registrationsand set toNobody can sign up(unless you’re planning on running a public instance) - Go into
Preferences->Administration->Server Settings->Discoveryand tickAllow trends without prior review(otherwise you’ll get regular emails asking you to approve newly observed hashtags). - Set up a cronjob to trigger
certbotand renew your cert
You might also want to consider adding some ActivityPub Relays to your server to help ensure that you get a wide range of content in your Federated tab. However, be aware that using a relay (at least, a busy one) can lead to significant media storage usage.
Mastodon 4.0 adds media expiry rules to the administration interface, but the thresholds are based on age rather than size, so make sure you’ve a decent amount of free space available.
Account Migration
Once you’re happy that your server is set up correctly, you’ll probably want to migrate your existing account over.
The Mastodon documentation is a little misleading on the process required, and relies quite heavily on you having thoroughly RTFM’d.
As an overview, what you need to do is:
- On your old server: export “You follow”, “Lists” (and block/mute etc if you’ve used those) to CSV
- On your new server: create an account alias for your old handle (e.g. add
@bentasker@mastodon.social) - On the old server: complete the migration form for a profile move
Once submitted, your followers will be moved over to your new profile, but nothing else will be.
If you log into your instance and go Preferences -> Import and export -> Import you can import the CSVs you exported earlier in order to restore your followers and other lists.
Even after you’ve migrated, you can request and download an ActivityPub format archive, which’ll include all your historic posts.
Odd Bits
These probably aren’t relevant to most users, but seemed worth noting on the offchance they help someone struggling with an obscure looking issue.
CDN Config
I route my Mastodon traffic via a CDN, and wanted static assets to cache there.
So, I added the following to the nginx config on the edge
location ~*  ^/(avatars|assets|emoji|headers|packs|shortcuts|sounds|system)/ {

        gunzip on;

        expires 30d;
        proxy_cache_valid  200 30d;
        proxy_cache_valid  404  5m;
        proxy_set_header X-Forwarded-For $remote_addr;
        proxy_set_header Host mastodon.headsoft.net;

        proxy_pass   https://origin;
        proxy_http_version 1.1;
        proxy_set_header Connection "";

        proxy_set_header Accept-Encoding gzip;
        proxy_set_header X-Real-IP  $remote_addr;
        proxy_cache my-cache;
        proxy_cache_revalidate on;
        proxy_cache_lock on;
        proxy_ignore_headers X-Accel-Expires Expires Cache-Control Set-Cookie Vary;
        add_header X-Clacks-Overhead "GNU Terry Pratchett";
}
This tells the CDN to cache responses for each of the named directories.
A well-known Screwup and the importance of testing
I ran into a strange issue after everything appeared to be up and running (I could search for users on other instances and view their posts etc).
When I tried to complete the migration form on mastodon.social it reported account not found.
Searching for my new the account using mastodon.social‘s search box led to it briefly popping a notification reporting
503: Certificate not valid
I was initially concerned that this meant that mastodon.social didn’t accept LetsEncrypt certificates, but the cause proved to be odder than this.
When you run a search (or submit the migration form), a webfinger request is sent to the remote mastodon server, for example
GET /.well-known/webfinger?resource=acct:mastodon.headsoft.net@mastodon.headsoft.net HTTP/1.1
These requests were failing with a 404, because my CDN’s LetsEncrypt handler was overly greedy in it’s matching
location ~ /.well-known/ {
    proxy_pass https://lemaster;
    proxy_set_header Host lemaster;
}
as a result, the request was being intercepted and sent to the wrong origin.
Once that config was corrected to be more specific
location ~ /.well-known/acme-challenge
Webfinger requests started working and it was possible to search for (and migrate) my account.
I haven’t gone digging in the codebase yet to see why the user-visible error message was quite so misleading.
The takeway from this is that, as with any federated/distributed system, the local system appearing to work without issue is not an indicator that non-local comms are working: you need to test both directions.
Server Requirements
When planning for this deployment, I had to decide whether Mastodon was going to need dedicated hardware, or if it could be deployed onto existing/shared hardware.
There are reports that Mastodon runs rather well on a Raspberry Pi 4. But then, the 4 cores and 4GB RAM that a Pi4 provides is really quite generous compared to some cloud based VMs.
I couldn’t find any documentation detailing minimum requirements for Mastodon, and so took something of a leap into the dark by deploying into an existing system (my rationale being that I could always move it later).
Because my systems run telegraf (with the Docker Input Plugin) to collect monitoring data into InfluxDB, I can see the resources that each Docker container uses.
As this is input to a scaling decision, we’re most interested in percentile, rather than mean usage (in this case, the 95th percentile).
I used the following Flux query to extract usage statistics
from(bucket: "telegraf")
 |> range(start: v.timeRangeStart, stop: v.timeRangeStop)
 |> filter(fn: (r) => r._measurement == "docker_container_cpu")
 |> filter(fn: (r) => r._field == "usage_percent")
 |> filter(fn: (r) => r.container_name == "redis" or
                      r.container_name == "streaming" or
                      r.container_name == "postgres" or
                      r.container_name == "sidekiq" or
                      r.container_name == "web"
 )
 |> keep(columns: ["_time", "_field", "_value", "container_name"])
 |> aggregateWindow(
        every: 5m,
        fn: (tables=<-, column) => tables
            |> quantile(q: 0.95, method: "exact_selector"),
    )

If we sum peak values we can see that
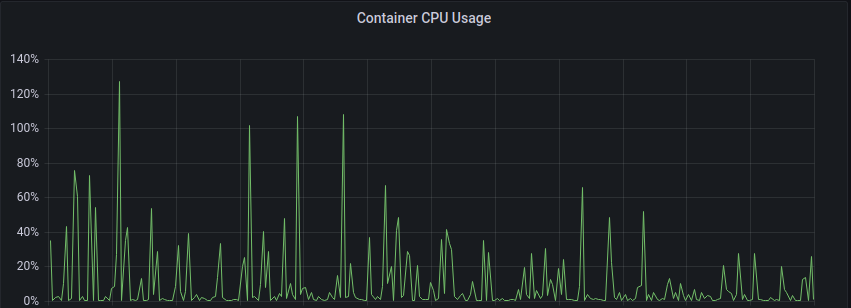
the maximum peak CPU demand was 127% (so 1.27 cores).
We can pull similar stats for RAM consumption
from(bucket: "telegraf")
 |> range(start: v.timeRangeStart, stop: v.timeRangeStop)
 |> filter(fn: (r) => r._measurement == "docker_container_mem")
 |> filter(fn: (r) => r._field == "usage")
 |> filter(fn: (r) => r.container_name == "redis" or
                      r.container_name == "streaming" or
                      r.container_name == "postgres" or
                      r.container_name == "sidekiq" or
                      r.container_name == "web"
 )
 |> keep(columns: ["_time", "_field", "_value", "container_name"])
 |> aggregateWindow(
        every: 5m,
        fn: (tables=<-, column) => tables
            |> quantile(q: 0.95, method: "exact_selector"),
    )

With total peak usage being

Finally, there’s bandwidth usage
from(bucket: "telegraf")
 |> range(start: v.timeRangeStart, stop: v.timeRangeStop)
 |> filter(fn: (r) => r._measurement == "docker_container_net")
 |> filter(fn: (r) => r._field == "tx_bytes" or r._field == "rx_bytes")
 |> filter(fn: (r) => r.container_name == "streaming" or
                      r.container_name == "web"
 )
 |> keep(columns: ["_time", "_field", "_value", "container_name"])
 |> derivative()
 |> aggregateWindow(
        every: 5m,
        fn: (tables=<-, column) => tables
            |> quantile(q: 0.95, method: "exact_selector"),
    )
 |> map(fn: (r) => ({r with _value: r._value * 8.0}))

Although there’s a near constant flow of comms, it’s at a very low level: in this 12 hour sample, just 3.53 MiB has hit the wire.
Resource demands will obviously depend on the number of users (and how it’s being used), but Mastodon is pretty resource light.
Conclusion
I thought I’d chosen the easy install route with docker-compose, however there were a few nuances and headaches along the way.
Some of the problems I ran into stemmed from wanting to deploy onto an existing system rather than a dedicated host, others (I suspect) were because the approach deviated slightly from the approach that the devs had in mind (the multi-container issue with environment variables during setup being an easy and obvious example).
It seems fair to say that it’s not quite the smooth seamless deployment experience that is normally associated with containerised applications.
But, having already performed an upgrade (to v4.0.2) it does look like those initial pains really are a one-off. Once you’ve got the system up and running, it’s relatively easy to apply upgrades (just pay attention to the upgrade instructions for each release!).
Whilst it might be tempting to argue that the lack of integrated backup solution is a shortcoming, I’m not entirely convinced that that’s the case: Backing each of the components up individually allows you to use tools that specialise in that area (there’s certainly no shortage of Postgres backup solutions out there) rather than ending up with some opaque blob which can only be restored if the application is willing to play nice.
I initially had some concerns about deploying an application without knowing what kind of resource demands it was going to make, but it seems there was no need to worry in this case: Mastodon runs extremely light.
Now that I’ve got a dedicated instance set up, my Mastodon interactions are a little less asynchronous, as there’s a much smaller delay between reply and notification. It also means that I can potentially experiment with various things (including setting up a bot to publish when I make a new post here – handy for those who are interested, but don’t want to be exposed to the nonsense I sometimes post to my main account).
It took more effort than I expected, but it’s already well worth that effort.